SFTP client guide
This page will provide you with information on how to upload and download your research data to and from the UNSW Data Archive using a SFTP Client. Researchers who upload or download more than 50 GB of data and/or more than 1000 files, at a time, should use a SFTP Client.
This page contains the following elements:
- Preparing to use the Data Archive
- Should I use the SFTP Client?
- System/setup requirements
- Uploading and downloading data to the Data Archive
- Help and further information
Preparing to use the Data Archive
Before you start uploading your research data to the Data Archive, make sure it is organised and in alignment with UNSW recommendations and, that you know the level of access you have to the Collections inside the Data Archive. Read the Preparing data for upload and the RDMP and the Data Archive pages for more information. To access the data archive you will need:
An active UNSW zID and zPass. To verify your zID/zPass visit the UNSW Identity management page.
Access to the UNSW Network, either on a UNSW campus or by using the UNSW VPN Service
An approved Research Data Management Plan (RDMP) (see the RDMP and Data Archive page for more information).
Research data identified and prepared for upload into the Data Archive.
Access levels appropriate to the tasks you wish to undertake within the Data Archive.
- If you are downloading data, you need to migrate that data online before you start the download, see our guide for how to do this.
Note: a word of caution; it is recommended that you retain a local copy of the research data you have uploaded to the Data Archive for two weeks, before local deletion, to ensure that all three copies of your data have been created and one copy has been taken off-site. See the When should I delete / remove the local copy of my data? FAQ for more information.
Should I use the SFTP Client?
The UNSW Data Archive Web application provides access to an interface enabling you to upload, download, locate, and review your research data. The Data Archive Web application is suitable for researchers who wish to search the Data Archive and to either upload or download less than 50 gigabytes (GB) of data and/or less then 1000 files (during a single session).
Researchers who frequently upload or download data, and/or generate datasets, may wish to schedule a regular upload or download of data using the Script or use SFTP rather than manually uploading and downloading data via the Web application.
- Researchers who upload or download more than 50 GB of data and/or more than 1000 files, at a time, please use SFTP by following the steps set out below.
- Researchers who wish to schedule a regular upload or download of data, please see the Command line Script guide.
System/setup requirements
To upload and download research data with SFTP (Secure File Transfer Protocol) you will need to have a SFTP Client on your PC. Instructions are provided below for FileZilla, which is available for Mac OS, Windows and Linux. Please contact your local IT support or the UNSW IT Service Centre (9385 1333) to get this application installed, or download from the FileZilla website if you are able to install software on your PC.
Note: You can use any software that supports SFTP connections, the settings you need are below:
- Host: rds.unsw.edu.au
- Port: 8022
- Protocol: SFTP
- Username: UNSW_RDS:zID (e.g. UNSW_RDS:z1234567)
- Password: [your zPass]
To verify your UNSW zID/zPass visit the UNSW Identity management page.
The following clients have been verified as working. Clients not on this list should also work but have not been tested:
- OSX SFTP (Mac OSX Command Line Client)
- Transmit (Mac OSX Client)
- WindSCP (Windows Client)
- FileZilla (Mac OSX/Windows/Linux Client)
- Cyberduck (Mac OSX Client)
Linux and SFTP:
Important: If you are downloading data, you need to migrate that data online before you start the download, see our guide for how to do this.
To connect to the Data Archive from a SSH terminal over SFTP you can use the following commands.
To find your SFTP version use this command:
sftp -V
For sftp version 7.7 onwards:
sftp -oPort=8022 -r sftp://UNSW_RDS:[zID]@rds.unsw.edu.au
Older linux systems may require a different command:
- sftp -oPort=8022 -r UNSW_RDS:[zID]@rds.unsw.edu.au or
- sftp -oPort=8022 UNSW_RDS:[zID]@rds.unsw.edu.au
If you are connecting from outside of the UNSW Network you will need to connect to the UNSW VPN first before connecting with SFTP. Alternatively, if you can SSH from the external computer with the data to a system on the UNSW Network (For example, from the NCI system to the Katana HPC cluster), you can use one of these commands to route your upload through the local system without needing the VPN:
sftp -oPort=8022 -J [zID]@kdm.restech.unsw.edu.au -r sftp://UNSW_RDS:[zID]@rds.unsw.edu.au
sftp -P 8022 -oProxyJump=[zID]@kdm.restech.unsw.edu.au:22 -r sftp://UNSW_RDS:[zID]@rds.unsw.edu.au
Note:
- You can use the put and get commands to transfer files.
- To send an entire folder depends on what version of SFTP is installed (version > 4.7).
- You can use dir or ls to list the files and folders in the current directory.
- For further information, see OpenBSD.
Setting up a FileZilla client:
1. Download FileZilla from the FileZilla website
2. Install the FileZilla application
3. Start/Open FileZilla
4. Click 'File', then 'Site Manager' or click the icon in the top right of FileZilla

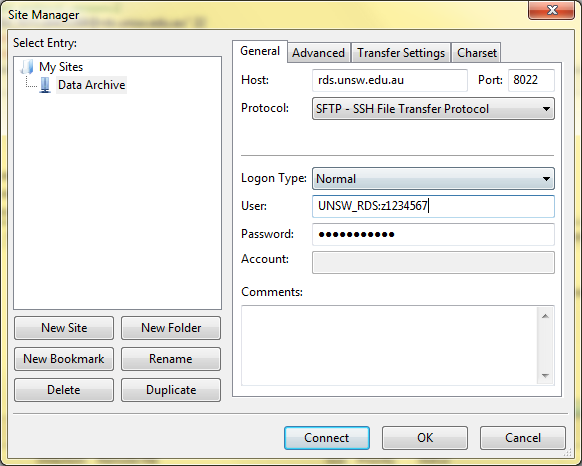
5. Click 'New Site', then fill in the details as displayed in the image below, including "SFTP" next to "Protocol":
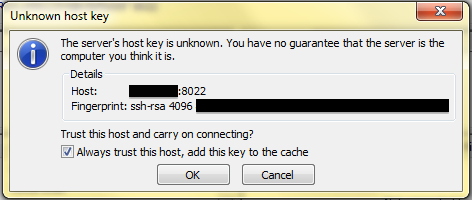
6. Click 'Connect'. This will start the connection to the server. A popup may appear asking you to confirm the host key of the server. It is safe to add this key to your cache by ticking the box.
7. You will see the Data Archive Collections you have access to in the 'Remote Site' panel on the right side. Navigate to the location you need here. You can browse your local computer's files on the 'Local Site' panel on the left.\
8. Some additional settings that can help your uploads are found in the File menu in Settings (FileZilla menu on Mac). Click Connection and then set your 'Timeout in seconds' to 90
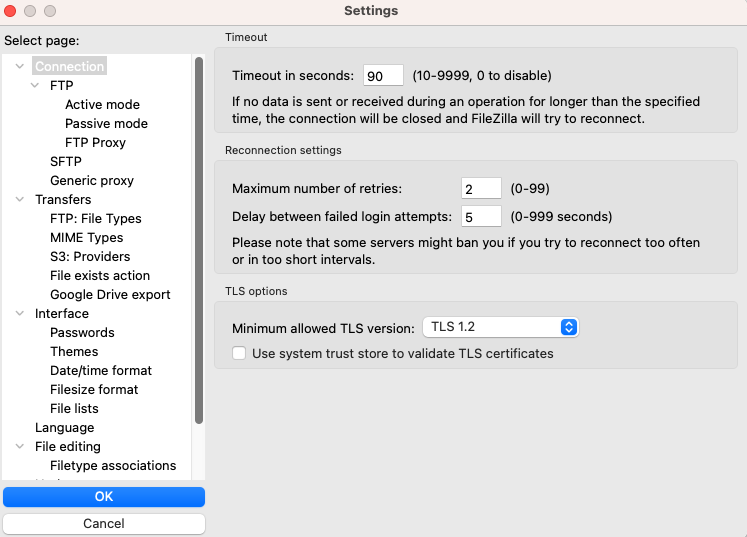
9. Click 'Transfers' and change 'Maximum simultaneous transfers' to a higher number such as 10.
![]()
Uploading and downloading data to the Data Archive
Note: you will need Lead Chief Investigator (LCI), Research Project Manager, or Contributor access rights to upload data to the Data Archive. See the How do I know what access level I have in the Data Archive? FAQ to find out your access rights for a project.
Important: If you are downloading data, you need to migrate that data online before you start the download, see our guide for how to do this.
1. Start/Open FileZilla
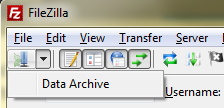
2. Click 'File' and select 'Data Archive' (or the name you chose when setting up the connection)
3. With the SFTP Client now open, drag the files and folders you want to transfer to the destination you require:
- for uploading files or folders, you will drag from Local Site to Remote Site
- for downloading files or folders, you drag from Remote Site to Local Site.
4. The files you are transferring will be queued in the bottom panel of the client and begin to transfer. Any errors will be listed in the "Failed Transfers" tab at the bottom. You can right-click in the panel to re-queue and retry an individual file, or all failures.
![]()
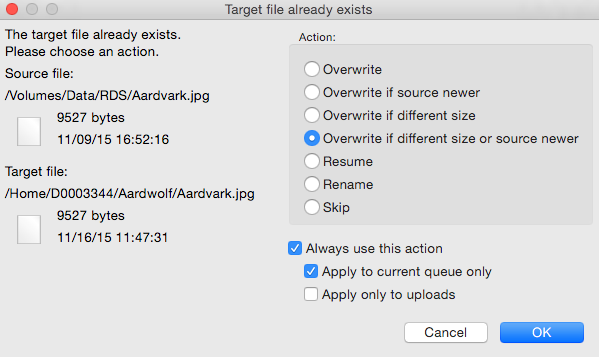
Note: when the 'Target file already exists' dialog box appears, where you are uploading a file already present in the Data Archive, and using FileZilla, select the following parameters:
Help and further information:
- For help and support when using the Data Archive, see
- all Help Topics
- all Frequently Asked Questions (FAQs)
- browse through the carousel on the homepage to view all available videos
- For information on the types of data to add to the Data Archive, see Preparing data for upload
- For more information on the access levels in the Data archive, see Roles and access inside the Data Archive
- For information on using the Data Archive Web application, see the Web application guide
- For information on finding data in the Data Archive, see Search, filters, view and favourites
- For information on metadata (descriptive data) automatically and manually added to your research data, see the Metadata guide
- For information on the relationship between a Research Data Management Plan (RDMP) and the Data Archive, see RDMP and the Data Archive
- For information on submitting a RDMP, see
- To create, or update, a Research Data Management Plan (RDMP) go to the ResToolkit service
- For information on data management at UNSW, see the Research Data Management Toolkit
- To access the Data Archive Web application, use this link, or, go to the Home page for other access options